Affordable Mastodon Hosting on Akash Network: Deploy in Minutes for Less Than $10/mo

By | Akash | No Comments

Why Akash?

This comprehensive guide will show you how to unlock the full potential of hosting Mastodon on Akash. Mastodon is an open-source social network platform that provides a powerful and secure way to communicate and collaborate with others. Akash is a decentralized cloud computing platform that allows users to deploy and manage distributed applications and services. By combining these two powerful technologies, you can benefit from a reliable, secure, and cost-effective hosting solution. This guide will provide you with the necessary information to get started and maximize the benefits of hosting Mastodon on Akash.

Requirements:

Click on Connect Wallet. Once you have completed the setup it’s time to generate the secrets for Mastodon.

High Level Overview:

  1. Create secrets/keys locally and configure Mailjet for a domain/email.
  2. Update required variables in YAML
  3. Deploy in Cloudmos

On your local machine

We need to first create secrets and vapid keys before deploying. Start by copy and pasting the YAML below into your favorite text editor. We need to update the variables.

To create secrets you need to run a Dockerfile locally:

docker run --rm -it --entrypoint /bin/bash lscr.io/linuxserver/mastodon generate-secret

Create 3 secrets and fill in PASSWORD=, SECRET_KEY_BASE=, and OTP_SECRET=

Now, for Vapid Keys Run

docker run --rm -it --entrypoint /bin/bash lscr.io/linuxserver/mastodon generate-vapid

and fill in VAPID_PRIVATE_KEY= and VAPID_PUBLIC_KEY= with the values.

Mailjet

You need to setup a free Mailjet account to enable the SMTP server as configured below. Once you account is created, add a domain and verify it. Then get your API key credentials and update them in the YAML as required. You cannot register/verify a user without a working SMTP server! Update SMTP_FROM_ADDRESS=, SMTP_LOGIN=, and SMTP_PASSWORD=.

Cloudmos Deploy

Create Deployment

Using Cloudmos Deploy create a new blank deployment and copy and paste the YAML with the updated variables into the online editor.

First Run

When you run the app for the first time, it will create the databases and start the web server. However, a configuration change is needed, and it may take up to three minutes for the process to complete. Please be patient and let the process finish. If you click on the URI at this point you will see in the logs :

mastodon: [ActionDispatch::HostAuthorization::DefaultResponseApp] Blocked host: o0ido8nb6lc8v04816ipu8vhss.ingress.america.computer 

Go to Cloudmos Deploy and find the deployment URI. This URI will be used to update the LOCAL_DOMAIN= and WEB_DOMAIN= environmental variables.

Edit the deployment YAML and locate the LOCAL_DOMAIN= and WEB_DOMAIN= environmental variables.

Update these variables with the full URI you copied from Cloudmos Deploy.

Click on “Update” to apply the changes to your deployment. Wait for the pod to be restarted. This may take a couple of minutes, so please be patient. Once the pod is restarted, try to access the URI. You may see an HTTPS warning, but it is safe to ignore it and proceed to the app. Finally, configure your DNS settings to point your domain to the URI.

version: "2.0"

services:
  mastodon:
    image: linuxserver/mastodon
    expose:
      - port: 443
        as: 443
        to:
          - global: true
      - port: 80
        as: 80
        to:
          - global: true
    env:
      - PUID=1000
      - PGID=1000
      - AWS_ACCESS_KEY_ID=
      - AWS_SECRET_ACCESS_KEY=
      - DB_HOST=db
      - DB_NAME=mastodon
      - DB_PASS=mastodon
      - DB_POOL=5
      - DB_PORT=5432
      - DB_USER=mastodon
      - ES_ENABLED=false
      - ES_HOST=es
      - ES_PASS=elastic
      - ES_PORT=9200
      - ES_USER=elastic
      - PASSWORD="" #Generated from (docker run --rm -it --entrypoint /bin/bash lscr.io/linuxserver/mastodon generate-secret)
      - LOCAL_DOMAIN= #Full URI used after deployment
      - OTP_SECRET="" #Generated from (docker run --rm -it --entrypoint /bin/bash lscr.io/linuxserver/mastodon generate-secret)
      - REDIS_HOST=redis
      - REDIS_PORT=6379
      - S3_ALIAS_HOST=
      - S3_BUCKET=
      - S3_ENABLED=false
      - SECRET_KEY_BASE=
      - SIDEKIQ_DEFAULT=false
      - SIDEKIQ_ONLY=false
      - SIDEKIQ_QUEUE=
      - SIDEKIQ_THREADS=5
      - SMTP_FROM_ADDRESS=mastodon@test.com #Signup for mailjet.com and setup email
      - SMTP_LOGIN= #mailjet API key
      - SMTP_PASSWORD= #mailjet secret 
      - SMTP_PORT=25
      - SMTP_SERVER=in-v3.mailjet.com
      - TZ=Etc/UTC
      - VAPID_PRIVATE_KEY="" #Generated from auth container (docker run --rm -it --entrypoint /bin/bash lscr.io/linuxserver/mastodon generate-vapid)
      - VAPID_PUBLIC_KEY="" #Generated from auth container command
      - WEB_DOMAIN= #Full URI used after deployment
    depends_on:
      - db
      - redis
  redis:
    image: redis:7-alpine
    expose:
      - port: 6379
        proto: tcp
        to:
          - service: mastodon
  db:
    image: postgres:14-alpine
    expose:
      - port: 5432
        proto: tcp
        to:
          - service: mastodon
    env:
      - POSTGRES_HOST_AUTH_METHOD=trust
      - POSTGRES_PASSWORD=mastodon
      - POSTGRES_DB=mastodon
      - POSTGRES_USER=mastodon
profiles:
  compute:
    mastodon:
      resources:
        cpu:
          units: 4.0
        memory:
          size: 2.5Gi
        storage:
          size: 16Gi
    redis:
      resources:
        cpu:
          units: 1
        memory:
          size: 1Gi
        storage:
          - size: 1Gi
    db:
      resources:
        cpu:
          units: 1
        memory:
          size: 1Gi
        storage:
          - size: 1Gi

  placement:
    akash:
      attributes:
        host: akash
      signedBy:
        anyOf:
          - "akash1365yvmc4s7awdyj3n2sav7xfx76adc6dnmlx63"
          - "akash18qa2a2ltfyvkyj0ggj3hkvuj6twzyumuaru9s4"
      pricing:
        mastodon:
          denom: uakt
          amount: 100000
        redis:
          denom: uakt
          amount: 1000
        db:
          denom: uakt
          amount: 1000

deployment:
  mastodon:
    akash:
      profile: mastodon
      count: 1
  redis:
    akash:
      profile: redis
      count: 1
  db:
    akash:
      profile: db
      count: 1      

Extra Resources

https://hub.docker.com/r/linuxserver/mastodon

How to Deploy Home Assistant on Proxmox: A Step-by-Step Guide

By | proxmox | No Comments

Proxmox is a powerful virtualization solution that can be used to deploy a wide range of applications, including Home Assistant, an open-source home automation platform. In this guide, we’ll show you how to deploy Home Assistant on Proxmox in just a few simple steps.

Step 1: Download the Home Assistant qcow2 file

The first step is to download the Home Assistant qcow2 file from the official Home Assistant website. The qcow2 file is a disk image file that contains the Home Assistant operating system and all of the necessary software packages. You can download the file using the following command:

wget https://download.homeassistant.io/qemuhomeassistant.qcow2

Step 2: Transfer the file to Proxmox

Once you have downloaded the qcow2 file, the next step is to transfer it to your Proxmox server. You can use the Rsync utility to transfer the file over the network. The following command will transfer the file to your Proxmox server:

rsync qemuhomeassistant.qcow2 root@<IP_ADDRESS>:/var/lib/vz/images/

Step 3: Create a new virtual machine

After transferring the qcow2 file to your Proxmox server, the next step is to create a new virtual machine. You can create a new virtual machine using the Proxmox web interface or the Proxmox command line interface. The following command will create a new virtual machine with ID 100 and 2 GB of memory:

qm create 100 --name homeassistant --memory 2048 --net0 virtio,bridge=vmbr0

Step 4: Attach the Home Assistant disk to the virtual machine

The next step is to attach the Home Assistant disk to the virtual machine. You can do this using the following command:

qm importdisk 100 qemuhomeassistant.qcow2 local-lvm
qm set 100 --scsihw virtio-scsi-pci --scsi0 local-lvm:vm-100-disk-0

Step 5: Start the virtual machine

After attaching the Home Assistant disk to the virtual machine, the next step is to start the virtual machine. You can start the virtual machine using the following command:

qm start 100

Step 6: Access Home Assistant

After starting the virtual machine, you can access Home Assistant using your web browser. The URL is http://<IP_ADDRESS>:8123. You can find the IP address of the virtual machine using the following command:

qm list

Conclusion

By following these simple steps, you can quickly deploy Home Assistant on Proxmox and start automating your home. Proxmox provides a powerful and flexible virtualization platform that makes it easy to create and manage virtual machines. Home Assistant, on the other hand, provides a powerful and flexible platform for home automation. Together, they make a great combination for anyone looking to automate their home.

By | proxmox | No Comments

Easily configure the trendnet TEG-10GECTX on Proxmox.

git clone https://github.com/acooks/tn40xx-driver/tree/linux-5.4
cd tn40xx-driver ; git checkout linux-5.4 
make clean ; make ; make install ; update-grub ; modprobe tn40xx

Install nvidia-docker on proxmox

By | Crypto Mining, Linux | No Comments

Install nvidia-docker on proxmox with this easy guide.

Remove the blacklist from /etc/modprobe.d/pve-blacklist.conf by commenting out "nvidiafb"

Add "non-free" to /etc/apt/sources.list
deb http://ftp.us.debian.org/debian buster main contrib non-free

apt-get update
apt-get install nvidia-driver nvidia-smi

Reboot!

apt-get update ; apt-get install docker.io docker-compose
curl -s -L https://nvidia.github.io/nvidia-docker/gpgkey | \
apt-key add -
distribution=$(. /etc/os-release;echo $ID$VERSION_ID)
curl -s -L https://nvidia.github.io/nvidia-docker/$distribution/nvidia-docker.list | \
tee /etc/apt/sources.list.d/nvidia-docker.list
apt-get update ; apt-get install nvidia-docker2

The current guest configuration does not support taking new snapshots

By | proxmox | No Comments

The current guest configuration does not support taking new snapshots is a common problem with Proxmox. Most people don’t know this is easily solved by making sure that the type of storage you use for VM’s is either lvm-thin or ZFS. If you don’t want to take a memory hit, make sure to use lvm-thin. You can also convert existing images to a new disk on the new zfs or lvm-thin storage you setup.

Ryzen 9 3900X on ASRockRack X470D4U2-2T

By | builds | No Comments

Ryzen 9 3900X on ASRockRack X470D4U2-2T running Proxmox with

 docker run -it 88plug/geekbench4

Geekbench 4 Score with stock bios settings is 50889!

https://browser.geekbench.com/v4/cpu/15830970

System Information
  Operating System              Ubuntu 20.04.1 LTS 5.4.34-1-pve x86_64
  Model                         To Be Filled By O.E.M. To Be Filled By O.E.M.
  Motherboard                   ASRockRack X470D4U2-2T
  Memory                        31.4 GB 
  BIOS                          American Megatrends Inc. L3.39A

Processor Information
  Name                          AMD Ryzen 9 3900X
  Topology                      1 Processor, 12 Cores, 24 Threads
  Identifier                    AuthenticAMD Family 23 Model 113 Stepping 0
  Base Frequency                3.80 GHz
  L1 Instruction Cache          32.0 KB x 12
  L1 Data Cache                 32.0 KB x 12
  L2 Cache                      512 KB x 12
  L3 Cache                      16.0 MB x 4

vm is locked proxmox

By | Linux | No Comments

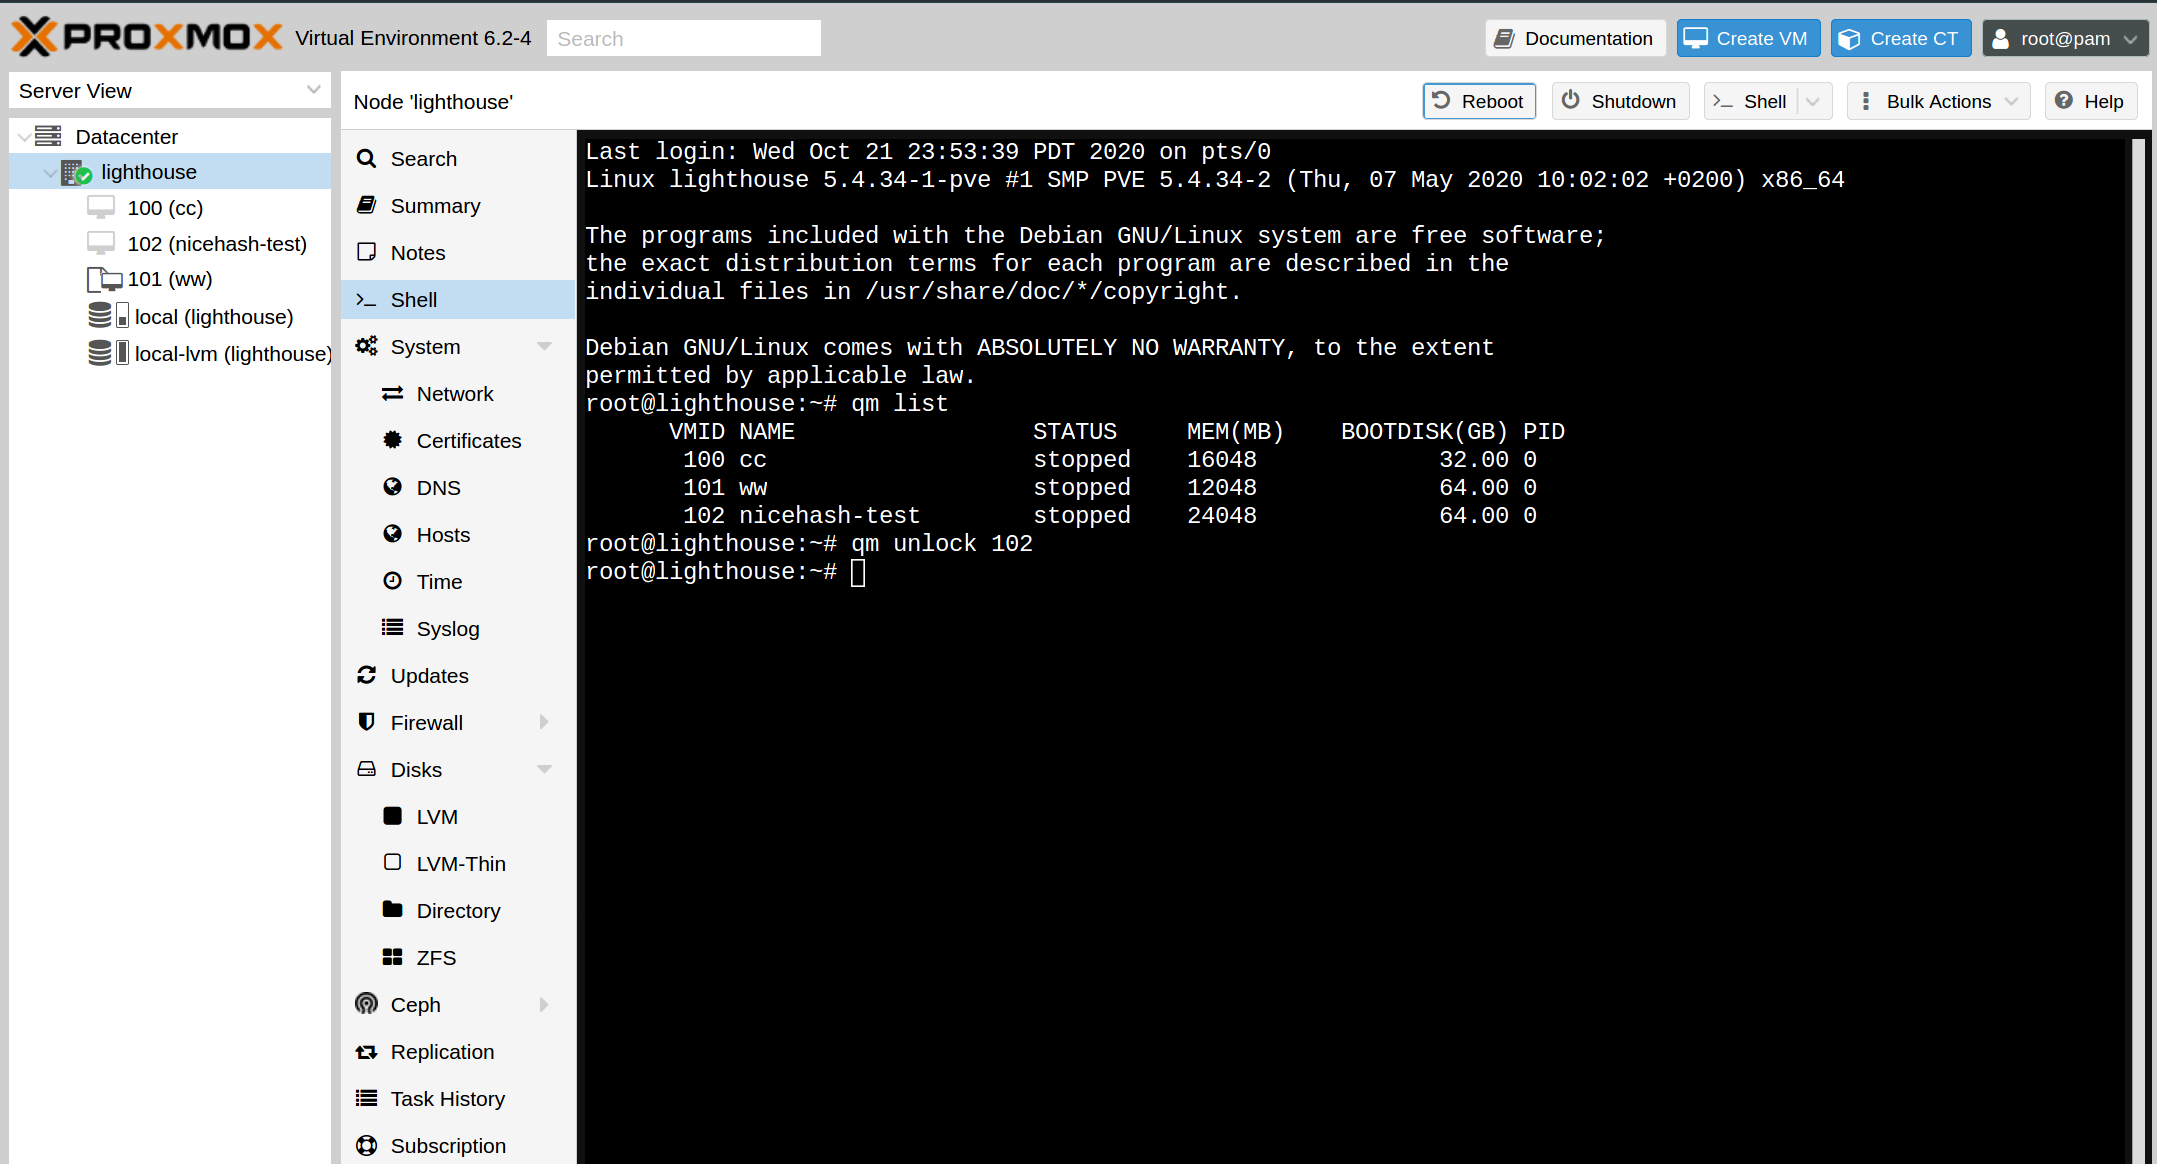
vm is locked is common issue in proxmox that is solved with a simple command to the vm on the command line

qm list
qm unlock $VMID
vm is locked proxmox container

Solves : container is locked proxmox
unlock container proxmox
unlock vm proxmox
vm unlock proxmox

ramdisk

By | Linux | No Comments

The best tool for a ramdisk on linux is simply adding the following line to your /etc/fstab.  Create the new mount directory first of course.

mkdir -p /mnt/ramdisk
sudo echo "tmpfs           /mnt/ramdisk tmpfs      defaults,size=8192M 0 0" >> /etc/fstab
sudo mount -a

How to Migrate Your DigitalOcean Droplet to an Unraid VM

By | Linux | 2 Comments

If you’re tired of paying for a DigitalOcean droplet and want to save money, you can migrate your droplet to an Unraid VM using this simple guide. By running your VPS locally, you could save hundreds or thousands of dollars a year. Here are the steps to follow:

Step 1: Set a Root Password for VNC

Before you start the migration, it’s important to set a root password for VNC. To do this, follow these steps:

  1. Shutdown or restart your DigitalOcean droplet into Recovery Mode in the DO Control Panel.
  2. Take note of the temporary root password shown in the console.

Step 2: Copy the Remote Disk Image of the DigitalOcean Droplet to Your Local Machine

Next, you need to copy the remote disk image of the DigitalOcean droplet to your local machine. You can do this with the following command:

ssh root@43.44.X.X "dd if=/dev/vda" | sudo dd of=88plug.raw bs=64k

This command will create a raw disk image of your DigitalOcean droplet and save it to a file called 88plug.raw on your local machine.

Step 3: Convert the Raw File to a Compatible IMG File for Unraid

After copying the disk image to your local machine, you need to convert it to a compatible img file for Unraid. You can do this with the following command:

qemu-img convert -p -O raw 88plug.raw disk.img

This command will create a disk image file called disk.img that is compatible with Unraid.

Step 4: Sync the Image File to Unraid

Next, you need to synchronize the disk image file to your Unraid server. You can use the following command to do this:

rsync -av --progress -e "ssh -T -c aes128-ctr -o Compression=no -x" disk.img root@tower.local:/mnt/user/domains/88plug/

This command will copy the disk image file to your Unraid server and save it to /mnt/user/domains/88plug/ the directory.

Step 5: Create a New VM with the Same OS as Your DO Droplet

Finally, you need to create a new virtual machine in Unraid with the same operating system as your DigitalOcean droplet. You can do this using the Unraid web interface or command line interface, and you’ll need to import the disk image file you created in Step 3. Here’s an example command to import the disk:

qm importdisk $VMID disk.img local-lvm

And to confirm the VM is created, you can list all available VMs with:

qm list

Bonus round: For other systems use the handy table below

Image formatArgument to qemu-img
QCOW2 (KVM, Xen)qcow2
QED (KVM)qed
rawraw
VDI (VirtualBox)vdi
VHD (Hyper-V)vpc
VMDK (VMware)vmdk

Bonus Round: Convert Raw to QCOW2 for Proxmox

If you’re using Proxmox, you’ll need to convert the raw file to a QCOW2 file format. You can do this with the following command:

qemu-img convert -p -O raw 88plug.raw disk.qcow2

What to do after you install proxmox?

By | Linux | No Comments

So you’ve finally installed ProxMox, now what?!

  1. Install a GUI!
  2. Configure Disks / Raid / Filesystems
  3. Run XShok!
wget https://raw.githubusercontent.com/extremeshok/xshok-proxmox/master/install-post.sh -c -O install-post.sh && bash install-post.sh && rm install-post.sh

New Samsung NVME is faster than RAM!

By | Asides | No Comments

The introduction of the Samsung 980 Pro with speeds claiming up to 7,000/5,000MB/s for read/write speed – this new era of PCIE 4.0 NVME is faster than ram! RAM costs about 10x more than NVME storage.

DDR4 Specs

Friendly nameIndustry namePeak Transfer RateData transfers/second (in millions)
DDR4-2400PC4-1920019200 MB/s2400
DDR4-2666PC4-2130021300 MB/s2666
DDR4-2933PC4-2340023400 MB/s2933
DDR4-3000PC4-2400024000 MB/s3000
DDR4-3200PC4-2560025600 MB/s3200
DDR4-3600PC4-2880028800 MB/s3600
DDR4-4000PC4-3200032000 MB/s4000
DDR4-4400PC4-3520035200 MB/s4400

DDR3 Specs

Friendly nameIndustry namePeak Transfer RateData transfers/second (in millions)
DDR3-800PC3-64006400 MB/s800
DDR3-1066PC3-85008533 MB/s1066
DDR3-1333PC3-1060010667 MB/s1333
DDR3-1600PC3-1280012800 MB/s1600

As you can see in these charts, this new speed if faster than base level DDR3 memory.

Best cpu frequency manager for linux

By | Linux | No Comments
cpu frequency manager for linux

By far the best cpu frequency manager for linux is a gnome extension call cpufreq. If you are not familiar with gnome extensions, they are very easy to manage and install. There is a Firefox plugin required, and once installed you can view your plugins here.

Features Include

  • Enable/Disable total cores in use
  • Granular control over power profiles
  • Easily set min/max frequency
  • Starts on boot and can be managed as a gnome plugin

Step 1 : Add the Gnome Firefox Plugin as prompted at the top of the page
Step 2: Click “On” button here

Best Hardware for the Pandemic of 2020

By | Interest | No Comments

A handy guide covering the best tech hardware of 2020 during the pandemic including graphics cards, motherboards, monitors, and more! Read all about the best hardware of the year…

Video Card
NVIDIA GTX 2070 SUPER

Hard to beat this mighty card and two of them will get you into 3090 territory. NVLink compatible they fly and for just $550 at the time of writing you can have some serious fun at 1440p and 4k! Don’t expect much above 60 fps at the Ultra settings but remember most people don’t have or cannot afford a 120hz display right now. Finally, these cards are “Upgrade Eligible” to 3080 and 3090 models at the current time. Learn more about this program here. Essentially you can pay EVGA the difference of the newer model card. Amazing offering. So buy a 2070 Super now, join the line for the upgrade to a 3080/3090 and enjoy great graphics card until then! Oh, and yes you could buy two 2070 Super, play with NVLink and upgrade both! Best of all, you don’t have to really decicde until later – maybe you like the 2070 Super enough to not upgrade when you can finally buy the 3080! EVGA Step Up Program

Motherboard
X470D4U2-2T

By far the best motherboard for a prosumer during the pandemic is the mighty X470D4U2-2T. This board features IPMI connectivety perfect to leave at home while you take off to your remote work cabin in the woods, or to keep running with dual 10 gigabit ethernet connections for a home grown VPN build. You can find these sub-$400 at the time of writing and this is well worth it for the IPMI and dual 10 GBE.

Hotspot
HTC 5G Hub

The value champion of the year! Found on eBay for $225 unlocked for any carrier – this Hub is no longer sold from Sprint but can still work on any carrier once unlocked! The devices runs full android and has a screen that is gorgeous, the processor and graphics are fast enough to watch 4k youtube. When it comes to wireless performance, the x55 chip has some of the fastest 4G speeds I have been able to find so far. Needed a sim that works with sprint/t-mobile to update the OS but after that, was still able to switch provider and use device with just about anything! The device has a speaker, usb-c, battery, and ethernet jack. It’s a truly amazing deal for the features available.

Portable Monitor
UPerfect 15″

This is the only edition that comes with a 10,000 MaH battery! Amazing product that makes it easy to plug into anything with an HDMI port even if you don’t have power for the display. The battery can even charge devices and the screen has speakers, a stand, and adjustable brightness! Considering the size, at 15″ – 4K is too small to even use on a display of this size, so stick to the 1080p model – and the one with a battery. You won’t regret it.

Phone
Xiaomi K20 Pro

4K TV
Samsung – 43″ Class 7 Series LED 4K UHD Smart Tizen TV
Samsung TU7000 / UN43TU7000FXZA

Samsung - 43" Class 7 Series LED 4K UHD Smart Tizen TV 
Samsung TU7000 / UN43TU7000FXZA

This TV is available for $279.99 at BestBuy and can be used as a monitor as long as you are sitting far enough back from the screen (about 4 feet).

Best FOSS 2020

By | Interest | No Comments

This is a list of the best FOSS or Free and Open-Source Software of apps that I have collected or used over the year.

DNS : Adguard-Home
Router (DHCP) : OpnSense
Firewall : OpnSense
Mail Server : Poste.io
Benchmarking : Geekbench4
Office Version : Office 2016 – Perpetrual License/No recurring fees!
Windows Version : Windows AME
Speedtest : Speedtest / Google Fiber
Virtualization : Vmware Workstation 16
Hypervisor : ProxMox
Linux OS : Zorin OS 15.3 Ultimate
Photo Editor (Linux) : snap install glimpse-editor
Monitoring : statping
Proxy : Nginx Proxy Manager