All Posts By

admin

WordPress on Akash Network: The New Era of Decentralized Hosting

By | Akash | No Comments

Today, we’ll delve deep into an exciting development in the realm of decentralized hosting – running WordPress, the world’s most popular content management system (CMS), on the Akash Network. This remarkable convergence introduces a new chapter in the era of decentralized hosting, bringing along a host of advantages that redefine the norms of web hosting.

A New Era of Decentralization

WordPress, a platform that powers more than a third of the web, now harnesses the power of Akash Network, an open-source and decentralized cloud computing platform. This new development allows WordPress to leverage underutilized compute capacity in data centers and edge servers worldwide, marking a significant milestone in decentralized hosting.

So why is WordPress on Akash such a groundbreaking leap? Here are some key reasons:

  1. Decentralization: Running WordPress on Akash shifts the infrastructure of your site from being reliant on a central entity to a more stable and reliable decentralized network.
  2. Censorship-resistant: Akash’s decentralized nature makes it resistant to censorship. It ensures your content remains accessible regardless of geopolitical constraints.
  3. Cost-Effective: Leveraging underused resources across various data centers, Akash often presents a more cost-effective solution than traditional hosting platforms.
  4. Security: Thanks to the inherent security of blockchain-based platforms, Akash ensures robust protection against a myriad of online threats.
  5. Flexibility: Akash provides you more control over your hosting environment and allows you to easily scale resources based on your requirements.

Delving Deeper: Advantages of WordPress on Akash Network

As we dig deeper, we uncover even more advantages of running WordPress on the Akash Network.

  1. Privacy and Sovereignty: With Akash, you maintain control over your data, fostering data sovereignty in contrast to traditional hosting platforms. With the rise in discussions about data privacy and security, decentralized networks like Akash offer a significant advantage. In contrast to traditional hosting platforms, where your data is stored on servers controlled by a central authority, Akash allows you to maintain control over your data. This aspect of data sovereignty is critical as it empowers the users to be in control of their own data.
  2. Redundancy and Resilience: The decentralized nature of Akash ensures that data and services are distributed across numerous nodes, mitigating the risk of a single point of failure and ensuring higher availability for your WordPress site. In a centralized network, if a server goes down, it can cause significant disruptions. On the other hand, in a decentralized network like Akash, data and services are distributed across numerous nodes, mitigating the risk of a single point of failure. This ensures higher availability and uptime for your WordPress site. nodes, mitigating the risk of a single point of failure and ensuring higher availability for your WordPress site.
  3. Scalability and Performance: Akash Network’s decentralized design also provides superior scalability and performance. Traditional web hosting services often suffer from bottlenecks during high traffic periods, causing slow loading times or even server crashes. With Akash, you can swiftly scale up resources as needed, ensuring your WordPress site remains responsive even during peak traffic.
  4. Innovation and Future-Proofing: By moving your WordPress site to Akash, you’re embracing an innovative, forward-thinking technology. Blockchain and decentralization are poised to be significant components of the internet’s future, known as Web 3.0. By starting now, you’re future-proofing your web presence and staying ahead of the curve.
  5. Customizability and Flexibility: Using Akash gives you unprecedented customizability and flexibility. The YAML configuration file you use to deploy your WordPress site allows for highly granular control over service interaction, environment variables, dependencies, and resources allocation. You have complete freedom to tweak and modify these settings to best suit your needs, something not typically available with traditional, more rigid hosting platforms.

The Bigger Picture

In addition to the benefits already discussed, here are some other broader implications of hosting WordPress on the Akash Network:

  1. Open Market for Compute Resources: Akash Network functions as an open marketplace for unused compute capacity, fostering a competitive market dynamic that can lead to lower costs and improved service quality.
  2. Enhanced Autonomy and Control: Akash grants website owners more control over their hosting environment. The YAML configuration file allows you to customize the compute resources dedicated to your WordPress site.
  3. Community-Driven Innovation: Being an open-source project, Akash Network enjoys the benefits of community-driven innovation, which means the technology is constantly being improved upon by a global community of developers and contributors.
  4. Greener Hosting: Akash Network is a more environmentally friendly choice for hosting. Unlike traditional data centers, Akash leverages underutilized compute capacity, promoting a more efficient use of existing resources.

In conclusion, running WordPress on Akash Network is about embracing a new paradigm in web hosting. It’s about taking advantage of the benefits of decentralization, from cost savings and improved performance to enhanced privacy and data sovereignty. It’s about joining an innovative community and contributing towards a more sustainable, efficient future for web hosting.

---
version: '2.0'
services:
  wordpress:
    image: wordpress
    depends_on:
    - db
    expose:
      - port: 80
        http_options:
          max_body_size: 104857600
        # accept: 
        # - "example.com"
        to:
          - global: true
    env:
      - WORDPRESS_DB_HOST=db
      - WORDPRESS_DB_USER=wordpress
      - WORDPRESS_DB_PASSWORD=testpass4you
      - WORDPRESS_DB_NAME=wordpress
    params:
      storage:
        wordpress-data:
          mount: /var/www/html
          readOnly: false
  db:
    # We use a mariadb image which supports both amd64 & arm64 architecture
    image: mariadb:10.6.4
    # If you really want to use MySQL, uncomment the following line
    #image: mysql:8.0.27
    expose:
      - port: 3306
        to:
          - service: wordpress
      - port: 33060
        to:
          - service: wordpress
    env:
      - MYSQL_RANDOM_ROOT_PASSWORD=1
      - MYSQL_DATABASE=wordpress
      - MYSQL_USER=wordpress
      - MYSQL_PASSWORD=testpass4you
    params:
      storage:
        wordpress-db:
          mount: /var/lib/mysql
          readOnly: false
profiles:
  compute:
    wordpress:
      resources:
        cpu:
          units: 4
        memory:
          size: 4Gi
        storage:
          - size: 4Gi
          - name: wordpress-data
            size: 32Gi
            attributes:
              persistent: true
              class: beta3
    db:
      resources:
        cpu:
          units: 1
        memory:
          size: 1Gi
        storage:
          - size: 1Gi
          - name: wordpress-db
            size: 8Gi
            attributes:
              persistent: true
              class: beta3
  placement:
    akash:
      #######################################################
      #Keep this section to deploy on trusted providers
      signedBy:
        anyOf:
          - "akash1365yvmc4s7awdyj3n2sav7xfx76adc6dnmlx63"
          - "akash18qa2a2ltfyvkyj0ggj3hkvuj6twzyumuaru9s4"
      #######################################################
      #Remove this section to deploy on untrusted providers
      #Beware* You may have deployment, security, or other issues on untrusted providers
      #https://docs.akash.network/providers/akash-audited-attributes
      pricing:
        wordpress:
          denom: uakt
          amount: 10000
        db:
          denom: uakt
          amount: 10000
deployment:
  wordpress:
    akash:
      profile: wordpress
      count: 1
  db:
    akash:
      profile: db
      count: 1

How to Map Additional IP Addresses to Your HostHatch VPS Running Debian 11

By | Hosting | No Comments

If you’ve purchased additional IP addresses for your HostHatch VPS running Debian 11, it’s important to map them correctly to ensure smooth operation of your website or application. In this guide, we’ll show you how to map additional IP addresses to your VPS in just three simple steps.

Step 1: Disable Any Pre-Existing Network Configurations

The first step is to disable any pre-existing network configurations that may conflict with your new IP addresses. To do this, create a file named /etc/cloud/cloud.cfg.d/99-disable-network-config.cfg and paste the following into it:

Paste the following into the file

network: {config: disabled}

Step 2: Edit the Network Configuration File

Next, you’ll need to edit the network configuration file. Open /etc/network/interfaces.d/50-cloud-init and make the following changes:

  • Add the new IP addresses under the ‘auto eth0’ line, replacing ‘eth0’ with your network interface name.
  • Set the IP address, netmask, and gateway for each new IP address.
  • Add the DNS nameservers for your server.

# This file is generated from information provided by the datasource. Changes

# to it will not persist across an instance reboot. To disable cloud-init's

# network configuration capabilities, write a file

# /etc/cloud/cloud.cfg.d/99-disable-network-config.cfg with the following:

# network: {config: disabled}

auto lo

iface lo inet loopback

auto eth0

iface eth0 inet static

 address 103.173.179.7

 netmask 255.255.255.0

 gateway 103.173.179.1

 dns-nameservers 1.1.1.1 1.0.0.1

auto eth0:0

iface eth0:0 inet static

 address 103.173.179.80

 netmask 255.255.255.0

auto eth0:1

iface eth0:1 inet static

 address 103.173.179.81

 netmask 255.255.255.0

auto eth0:2

iface eth0:2 inet static

 address 212.52.0.10

 netmask 255.255.255.0

 gateway 212.52.0.1

 dns-nameservers 1.1.1.1 1.0.0.1

auto eth0:3

iface eth0:3 inet static

 address 212.52.0.222

 netmask 255.255.255.0

 gateway 212.52.0.1

 dns-nameservers 1.1.1.1 1.0.0.1

Step 3: Restart the Networking Service

Finally, restart the networking service to apply the changes:

systemctl restart networking

That’s it! Your additional IP addresses are now mapped to your VPS running Debian 11. With this guide, you can easily expand the capabilities of your HostHatch VPS and ensure that your website or application runs smoothly.

Optimizing Your Chia Farming Operation: A Guide to Using Chia Farming Scripts for GPU Plotting and Efficient Plot Management

By | Chia, Docker, NVIDIA | No Comments

Chia farming has become increasingly popular as people look for ways to earn rewards by utilizing their computer’s processing power. While Chia farming can be a lucrative endeavor, it also requires a lot of disk space and can be a time-consuming process. Fortunately, these Chia farming scripts can help you optimize your plotting process, farm your plots, and move them efficiently, making your Chia farming operation more streamlined and potentially more profitable.

https://github.com/88plug/chia-farming

The first step in the Chia farming process is to prepare your hard drives. The prepare-drives.sh script can help you automate this process by formatting your specified drives with an ext4 file system, setting reserve space to 0%, disabling write-cache, and optimizing read-ahead caching for performance. This can help you save time and ensure that your hard drives are optimized for Chia farming.

Once your hard drives are prepared, you can start creating Bladebit plots. The Bladebit algorithm is faster than the CPU-based plotting algorithms and doesn’t require CUDA. The bladebit-plotting.sh script runs a Docker container that is configured with the necessary environment variables to create Bladebit plots efficiently. With Bladebit plots, you can potentially earn more rewards and speed up your Chia farming operation.

If you have a compatible GPU, you can create C7 Bladebit plots with the bladebit-cuda-plotting.sh script. This script uses the bladebit_cuda command-line tool to create plots with your GPU. The plots are generated with a plot count of 50000 and a thread count of 16. With C7 plots, you can further accelerate your Chia farming and potentially earn more rewards.

Once you’ve created your Bladebit CUDA plots, you’ll need to farm them to earn rewards. The harvester-compose.yml file provides a convenient way to configure a Docker container to farm your Bladebit CUDA plots. The file specifies a service named chia_harvester that runs a Docker container based on the cryptoandcoffee/chia-node-cuda:1 image. The container is configured to run as a harvester, and it connects to your farmer using the specified farmer_address and farmer_port. The container also specifies the location of the CA folder from your farmer, which is mounted as a volume inside the container. This allows the container to access your Bladebit CUDA plots, which are stored in the /plots directory.

Efficiently moving your plots is also important when it comes to Chia farming. The plot-mover.sh script can help you do this by using a list of farming drives and shuffling it to find an available drive. If a drive is available, the script checks for new plot files in the specified source directory and moves the first available plot file to the farming drive. The script can handle multiple transfers simultaneously and waits for a few seconds before checking for new plot files or available drives again. This can help you manage your Chia farming operation and keep your plots organized.

In addition to these scripts, there are other things you can do to optimize your Chia farming operation. For example, you may want to consider using a RAM disk to speed up the plotting process or using a network-attached storage (NAS) device to store your plots. You can also use tools like Chia Plot Manager to manage and monitor your plots.

It’s important to keep in mind that Chia farming can require a lot of disk space, and it may take some time before you start seeing rewards. However, with the help of these scripts and other optimization techniques, you can potentially earn more rewards and make your Chia farming operation more efficient. Just be sure to use these scripts carefully and only run them on drives that are dedicated to Chia farming.

In conclusion, Chia farming can be a rewarding activity if done correctly. By using these Chia farming scripts and other optimization techniques

Cloudmos Provider Dashboard: Choose the Best Akash Network Provider

By | Akash | No Comments
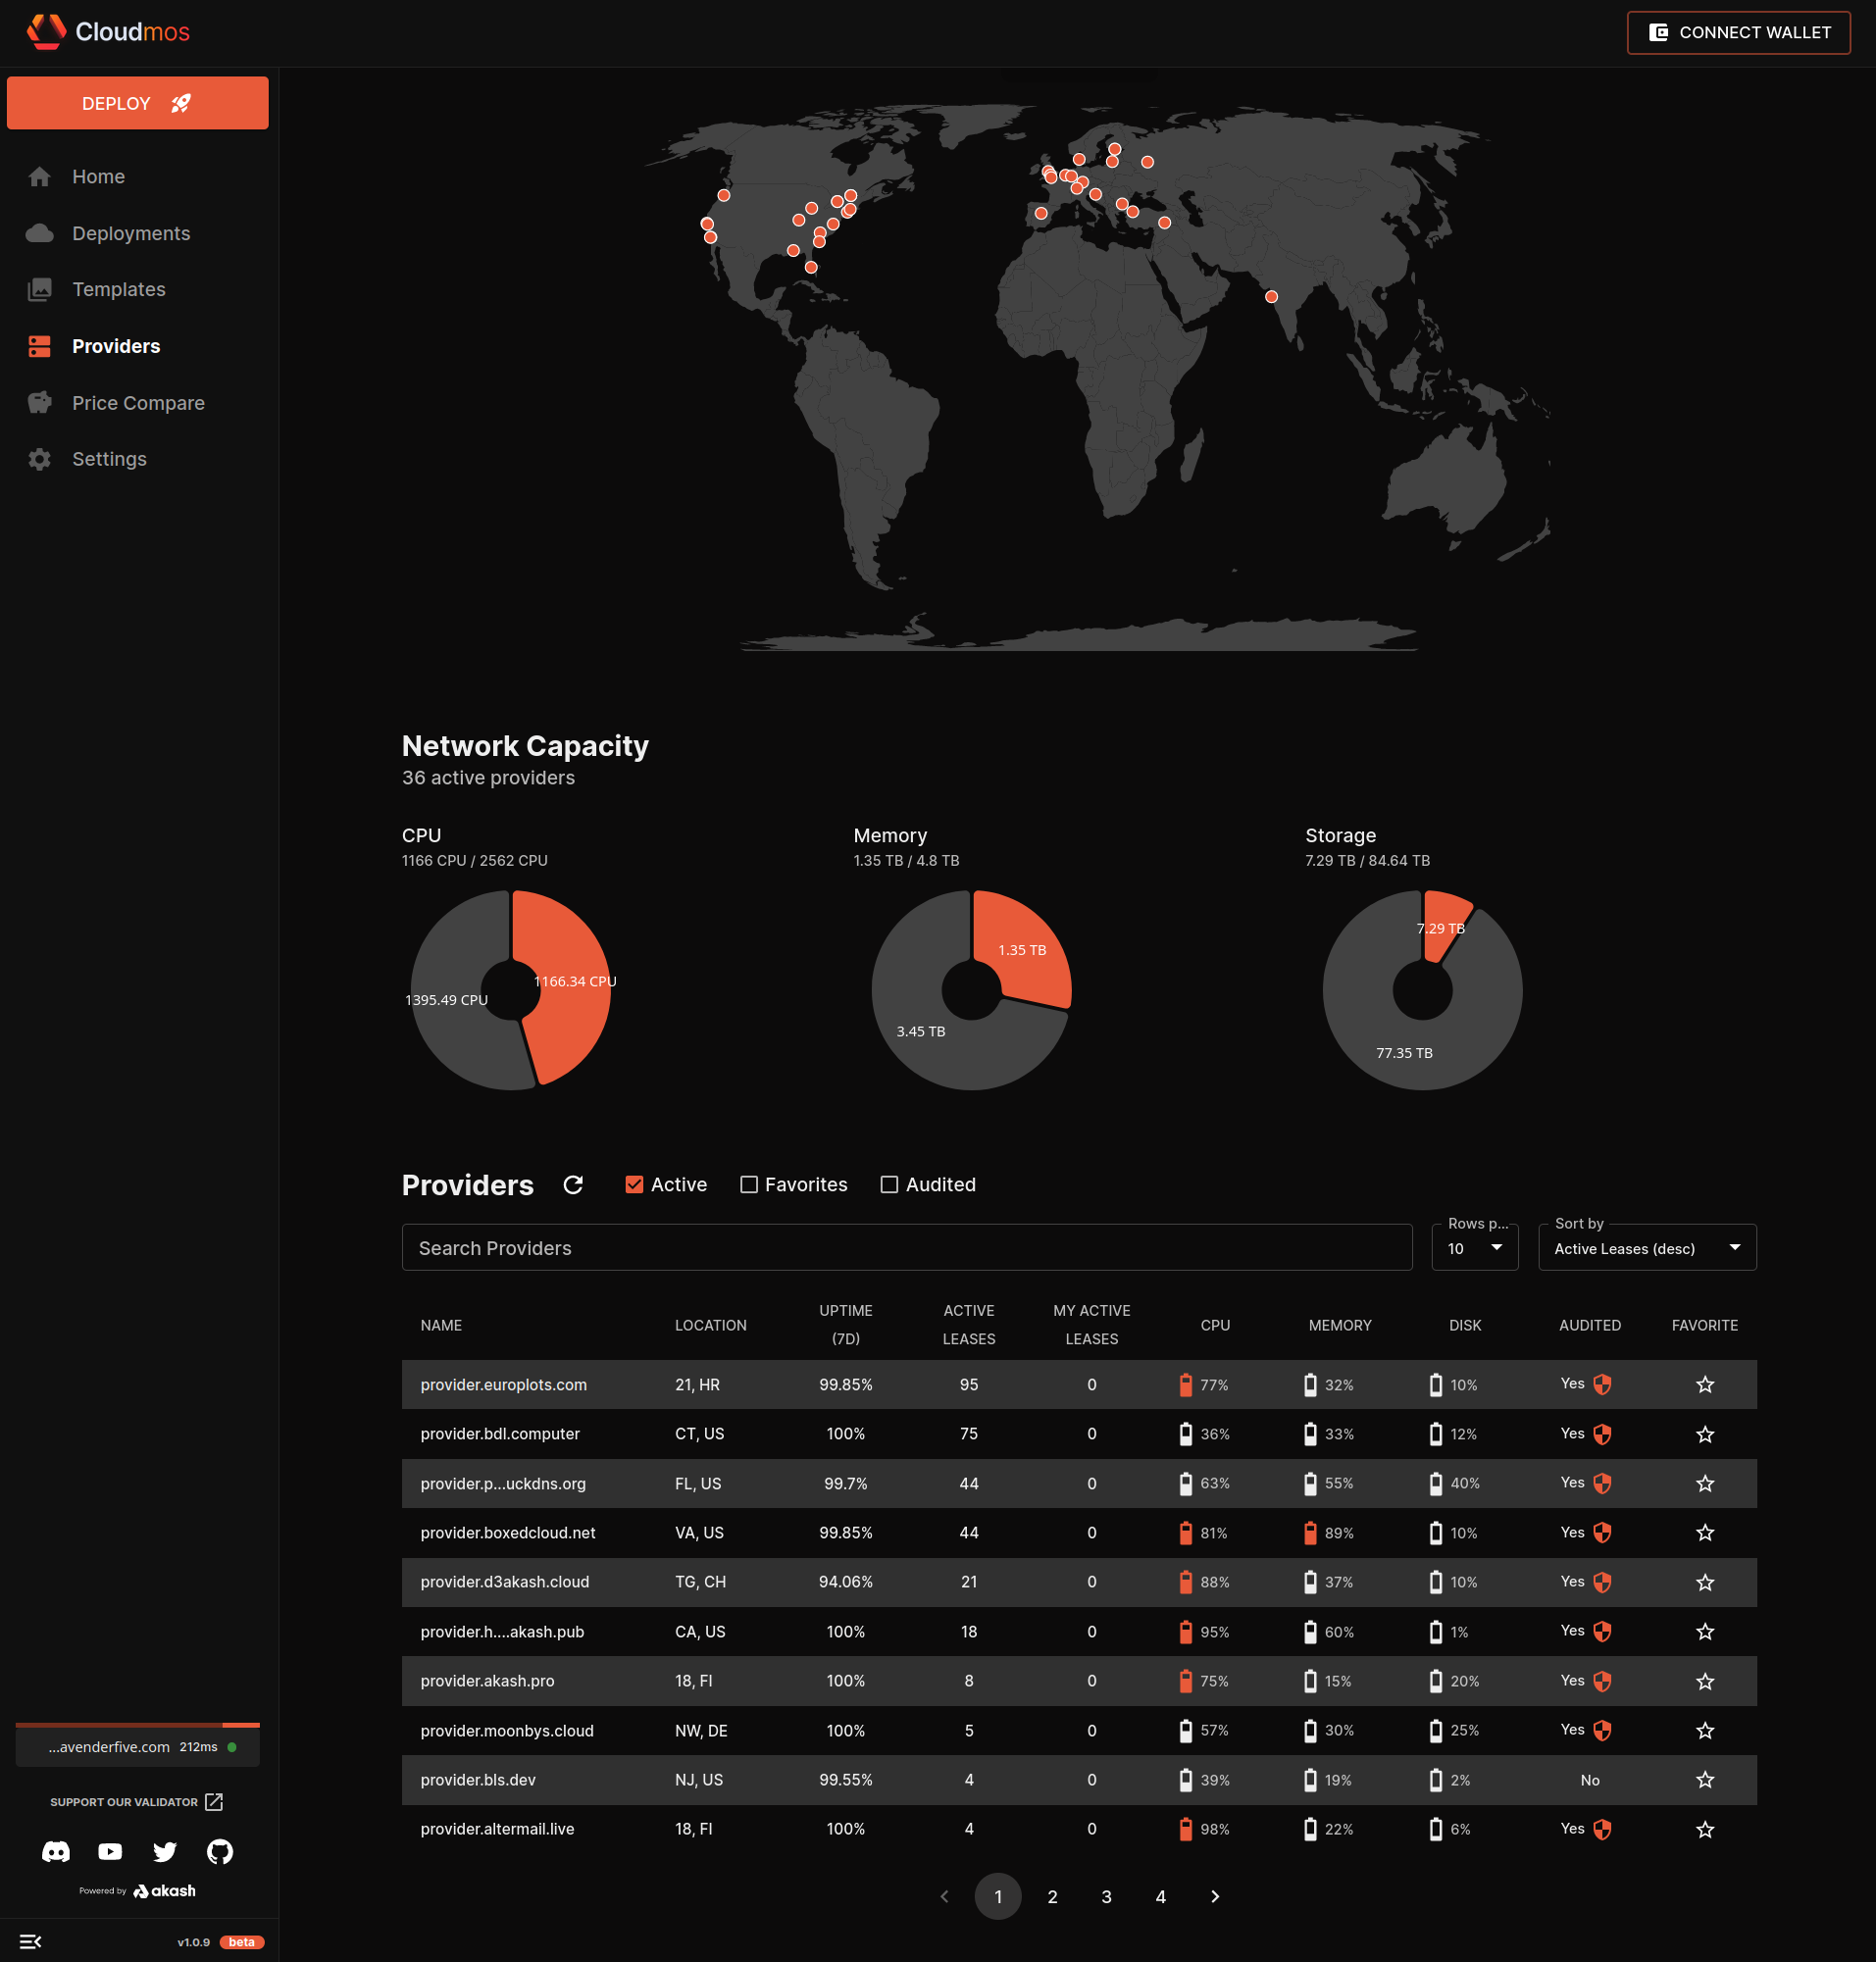
Cloudmos Provider Dashboard
Compare performance and reliability of Akash Network providers with Cloudmos real-time dashboard.

As the demand for decentralized cloud services continues to grow, the Akash Network has emerged as one of the leading platforms for deploying and hosting decentralized applications. With its unique features and user-friendly interface, the Akash Network has made it easier than ever for developers and businesses to build and host their applications on a decentralized cloud.

One of the key factors that contribute to the success of the Akash Network is the availability of a wide range of providers on the platform. These providers are responsible for offering the necessary resources, including CPU, memory, disk space, and uptime, to support the applications hosted on the Akash Network.

To ensure that users have the best possible experience on the platform, Cloudmos, a leading provider of decentralized cloud services, has launched a new provider dashboard that makes it easy to check the performance and reliability of providers on the Akash Network.

In this blog post, we will take a closer look at the new provider dashboard on Cloudmos deploy and explore how it can help users make informed decisions when choosing a provider on the Akash Network.

The Importance of Choosing the Right Provider

Choosing the right provider is crucial when it comes to deploying and hosting applications on the Akash Network. The performance and reliability of the provider can have a significant impact on the performance and uptime of the application.

There are several factors that users should consider when choosing a provider on the Akash Network, including:

  • CPU: The CPU is responsible for executing instructions and performing calculations. The higher the CPU, the faster the application can process data.
  • Memory: The memory is responsible for storing data that the application needs to access frequently. The more memory available, the faster the application can access data.
  • Disk Space: The disk space is responsible for storing the data and files required by the application. The more disk space available, the more data the application can store.
  • Uptime: Uptime refers to the amount of time that the provider is available and accessible. Providers with higher uptime are more reliable and less likely to experience downtime.

The New Provider Dashboard on Cloudmos Deploy

To help users choose the right provider on the Akash Network, Cloudmos has launched a new provider dashboard that provides real-time information on the performance and reliability of providers on the platform.

The dashboard provides users with a range of information, including:

  • CPU: The dashboard displays the total CPU available on the Akash Network, as well as the CPU available from the user’s selected providers. Users can easily compare the CPU available from different providers to make informed decisions.
  • Memory: The dashboard displays the total memory available on the Akash Network, as well as the memory available from the user’s selected providers. Users can easily compare the memory available from different providers to ensure that their applications have the necessary resources to perform optimally.
  • Disk Space: The dashboard displays the total disk space available on the Akash Network, as well as the disk space available from the user’s selected providers. Users can easily compare the disk space available from different providers to ensure that their applications have the necessary space to store data and files.
  • Uptime: The dashboard displays the uptime of each provider over the past seven days. Users can easily compare the uptime of different providers to ensure that they choose a provider with a high level of reliability.

In addition to these key metrics, the dashboard also allows users to search for providers based on location, audited status, and favorite status. Users can also sort providers by name, location, uptime, active leases, and more.

How to Use the Provider Dashboard on Cloudmos Deploy

Using the provider dashboard on Cloudmos Deploy is simple and straightforward. Here’s how to get started:

Step 1: Log in to your Cloudmos account and navigate to the provider dashboard.

Step 2: Select the providers that you want to compare by clicking on the checkboxes next to their names. You can select up to 10 providers at a time.

Step 3: Use the filters to narrow down your search based on location, audited status, and favorite status.

Step 4: Sort the providers by name, location, uptime, active leases, CPU, memory, or disk space by clicking on the respective column header.

Step 5: Review the data displayed on the dashboard to compare the performance and reliability of the selected providers.

Step 6: Use the information to make an informed decision when choosing a provider for your application.

The Benefits of Using the Provider Dashboard on Cloudmos Deploy

The provider dashboard on Cloudmos Deploy provides several benefits to users looking to deploy and host applications on the Akash Network. These benefits include:

  1. Real-time information: The dashboard provides real-time information on the performance and reliability of providers on the Akash Network. This information is updated regularly, ensuring that users have access to the most up-to-date data.
  2. Easy comparison: The dashboard allows users to compare the performance and reliability of multiple providers at once, making it easy to make informed decisions when choosing a provider for their application.
  3. User-friendly interface: The dashboard is designed with a user-friendly interface that makes it easy to navigate and understand the data presented.
  4. Customizable filters: The dashboard includes customizable filters that allow users to narrow down their search based on location, audited status, and favorite status.
  5. Detailed metrics: The dashboard provides detailed metrics on CPU, memory, disk space, and uptime, allowing users to make data-driven decisions when choosing a provider.
  6. Increased transparency: The provider dashboard increases transparency on the Akash Network by providing users with access to real-time data on provider performance and reliability.

Conclusion

The provider dashboard on Cloudmos Deploy is an essential tool for users looking to deploy and host applications on the Akash Network. The dashboard provides real-time information on the performance and reliability of providers, allowing users to make informed decisions when choosing a provider for their application.

By using the customizable filters and sorting options on the dashboard, users can quickly and easily compare the performance and reliability of multiple providers, ensuring that they choose the best provider for their needs.

Overall, the provider dashboard on Cloudmos Deploy is an excellent addition to the Akash Network, providing increased transparency and making it easier than ever for users to deploy and host their applications on a decentralized cloud.

Stable Diffusion on Akash Network with Cloudmos for less than $1/day

By | Akash | No Comments

Discover an affordable, high-speed solution to deploy your applications on the decentralized cloud using Cloudmos – GPU support coming soon!

Introduction

https://deploy.cloudmos.io/templates/akash-network-awesome-akash-stable-diffusion-ui stable diffusion
Easy Diffusion 2.5

The Akash Network has emerged as a leading decentralized cloud computing platform, offering developers an affordable, fast, and user-friendly alternative to traditional cloud providers. As the demand for stable diffusion and better resource allocation increases, the Akash Network has adapted to meet these requirements by integrating new support for stable diffusion. One such powerful tool that facilitates this is Cloudmos deploy – an innovative deployment solution that allows users to harness Akash’s capabilities without a GPU. In this comprehensive blog post, we will explore how to deploy your applications on the Akash Network using Cloudmos deploy – a cost-effective, rapid, and seamless process that doesn’t require a GPU.

Deploy Easy Diffusion 2.5 for $0.75/day on bdl.computer

Cloudmos Deploy is a cloud-based service that provides users with a simple and efficient way to deploy applications. The platform is built on top of the Akash Network, which is a decentralized marketplace of compute resources. Cloudmos Deploy allows users to deploy their applications on the Akash Network with just a few clicks.

One of the main features of Cloudmos Deploy is the Template Gallery, which currently contains over 180 pre-built templates. These templates cover a wide range of applications and use cases, including database management tools like pgAdmin and phpMyAdmin, decentralized finance (DeFi) platforms like Uniswap and Pancake Swap, and even classic games like Tetris and Pac-Man. The templates are constantly being updated with new templates to cover emerging technologies and trends. Especially Machine Learning and A.I.

Click on the Easy Diffusion 2.5 link or Cloudmos Logo to directly deploy the SDL to Akash.

---
version: "2.0"

services:
  stable-diffusion-ui:
    image: cryptoandcoffee/akash-stable-diffusion-ui:3
    expose:
      - port: 9000
        as: 80
        to:
          - global: true

profiles:
  compute:
    stable-diffusion-ui:
      resources:
        cpu:
          units: 16
          # For quicker performance of Stable Diffusion, it's recommended to increase the CPU capacity. 
          # You can try using 32, 64, or 128 units to achieve faster processing. In case you don't receive any bids,
          # consider lowering the requested CPU capacity. Note that the maximum CPU units allowed are 256.
        memory:
          size: 10Gi
          # Stable Diffusion needs at least 8Gi of memory.
        storage:
          size: 32Gi
          # Stable Diffusion requires at least 25Gi of disk space. 
  placement:
    akash:
      #######################################################
      #Keep this section to deploy on trusted providers
      signedBy:
        anyOf:
          - "akash1365yvmc4s7awdyj3n2sav7xfx76adc6dnmlx63"
          - "akash18qa2a2ltfyvkyj0ggj3hkvuj6twzyumuaru9s4"
      #######################################################
      #Remove this section to deploy on untrusted providers
      #Beware* You may have deployment, security, or other issues on untrusted providers
      #https://docs.akash.network/providers/akash-audited-attributes
      pricing:
        stable-diffusion-ui:
          denom: uakt
          amount: 100000

deployment:
  stable-diffusion-ui:
    akash:
      profile: stable-diffusion-ui
      count: 1

Mastodon Hosting on Akash Network: Deploy in Minutes for Less Than $10/mo

By | Akash | No Comments

Why Akash?

This comprehensive guide will show you how to unlock the full potential of hosting Mastodon on Akash. Mastodon is an open-source social network platform that provides a powerful and secure way to communicate and collaborate with others. Akash is a decentralized cloud computing platform that allows users to deploy and manage distributed applications and services. By combining these two powerful technologies, you can benefit from a reliable, secure, and cost-effective hosting solution. This guide will provide you with the necessary information to get started and maximize the benefits of hosting Mastodon on Akash.

Requirements:

Setup Overview:

  1. Create secrets/keys locally and configure Mailjet for a domain/email.
  2. Update required variables in YAML
  3. Deploy in Cloudmos

On your local machine

We need to first create secrets and vapid keys before deploying. Start by copy and pasting the YAML below into your favorite text editor. We need to update the variables.

To create secrets you need to run a Dockerfile locally:

docker run --rm -it --entrypoint /bin/bash lscr.io/linuxserver/mastodon generate-secret

Create 3 secrets and fill in PASSWORD=, SECRET_KEY_BASE=, and OTP_SECRET=

Now, for Vapid Keys Run

docker run --rm -it --entrypoint /bin/bash lscr.io/linuxserver/mastodon generate-vapid

and fill in VAPID_PRIVATE_KEY= and VAPID_PUBLIC_KEY= with the values.

Mailjet

You need to setup a free Mailjet account to enable the SMTP server as configured below. Once you account is created, add a domain and verify it. Then get your API key credentials and update them in the YAML as required. You cannot register/verify a user without a working SMTP server! Update SMTP_FROM_ADDRESS=, SMTP_LOGIN=, and SMTP_PASSWORD=.

Cloudmos Deploy

Create Deployment

Using Cloudmos Deploy create a new blank deployment and copy and paste the YAML with the updated variables into the online editor.

First Run

When you run the app for the first time, it will create the databases and start the web server. However, a configuration change is needed, and it may take up to three minutes for the process to complete. Please be patient and let the process finish. If you click on the URI at this point you will see in the logs :

mastodon: [ActionDispatch::HostAuthorization::DefaultResponseApp] Blocked host: o0ido8nb6lc8v04816ipu8vhss.ingress.america.computer 

Go to Cloudmos Deploy and find the deployment URI. This URI will be used to update the LOCAL_DOMAIN= and WEB_DOMAIN= environmental variables.

Edit the deployment YAML and locate the LOCAL_DOMAIN= and WEB_DOMAIN= environmental variables.

Update these variables with the full URI you copied from Cloudmos Deploy.

Click on “Update” to apply the changes to your deployment. Wait for the pod to be restarted. This may take a couple of minutes, so please be patient. Once the pod is restarted, try to access the URI. You may see an HTTPS warning, but it is safe to ignore it and proceed to the app. Finally, configure your DNS settings to point your domain to the URI.

version: "2.0"

services:
  mastodon:
    image: linuxserver/mastodon
    expose:
      - port: 443
        as: 443
        to:
          - global: true
      - port: 80
        as: 80
        to:
          - global: true
    env:
      - PUID=1000
      - PGID=1000
      - AWS_ACCESS_KEY_ID=
      - AWS_SECRET_ACCESS_KEY=
      - DB_HOST=db
      - DB_NAME=mastodon
      - DB_PASS=mastodon
      - DB_POOL=5
      - DB_PORT=5432
      - DB_USER=mastodon
      - ES_ENABLED=false
      - ES_HOST=es
      - ES_PASS=elastic
      - ES_PORT=9200
      - ES_USER=elastic
      - PASSWORD="" #Generated from (docker run --rm -it --entrypoint /bin/bash lscr.io/linuxserver/mastodon generate-secret)
      - LOCAL_DOMAIN= #Full URI used after deployment
      - OTP_SECRET="" #Generated from (docker run --rm -it --entrypoint /bin/bash lscr.io/linuxserver/mastodon generate-secret)
      - REDIS_HOST=redis
      - REDIS_PORT=6379
      - S3_ALIAS_HOST=
      - S3_BUCKET=
      - S3_ENABLED=false
      - SECRET_KEY_BASE=
      - SIDEKIQ_DEFAULT=false
      - SIDEKIQ_ONLY=false
      - SIDEKIQ_QUEUE=
      - SIDEKIQ_THREADS=5
      - SMTP_FROM_ADDRESS=mastodon@test.com #Signup for mailjet.com and setup email
      - SMTP_LOGIN= #mailjet API key
      - SMTP_PASSWORD= #mailjet secret 
      - SMTP_PORT=25
      - SMTP_SERVER=in-v3.mailjet.com
      - TZ=Etc/UTC
      - VAPID_PRIVATE_KEY="" #Generated from auth container (docker run --rm -it --entrypoint /bin/bash lscr.io/linuxserver/mastodon generate-vapid)
      - VAPID_PUBLIC_KEY="" #Generated from auth container command
      - WEB_DOMAIN= #Full URI used after deployment
    depends_on:
      - db
      - redis
  redis:
    image: redis:7-alpine
    expose:
      - port: 6379
        proto: tcp
        to:
          - service: mastodon
  db:
    image: postgres:14-alpine
    expose:
      - port: 5432
        proto: tcp
        to:
          - service: mastodon
    env:
      - POSTGRES_HOST_AUTH_METHOD=trust
      - POSTGRES_PASSWORD=mastodon
      - POSTGRES_DB=mastodon
      - POSTGRES_USER=mastodon
profiles:
  compute:
    mastodon:
      resources:
        cpu:
          units: 4.0
        memory:
          size: 2.5Gi
        storage:
          size: 16Gi
    redis:
      resources:
        cpu:
          units: 1
        memory:
          size: 1Gi
        storage:
          - size: 1Gi
    db:
      resources:
        cpu:
          units: 1
        memory:
          size: 1Gi
        storage:
          - size: 1Gi

  placement:
    akash:
      attributes:
        host: akash
      signedBy:
        anyOf:
          - "akash1365yvmc4s7awdyj3n2sav7xfx76adc6dnmlx63"
          - "akash18qa2a2ltfyvkyj0ggj3hkvuj6twzyumuaru9s4"
      pricing:
        mastodon:
          denom: uakt
          amount: 100000
        redis:
          denom: uakt
          amount: 1000
        db:
          denom: uakt
          amount: 1000

deployment:
  mastodon:
    akash:
      profile: mastodon
      count: 1
  redis:
    akash:
      profile: redis
      count: 1
  db:
    akash:
      profile: db
      count: 1      
Extra Resources

https://hub.docker.com/r/linuxserver/mastodon

How to Deploy Home Assistant on Proxmox: A Step-by-Step Guide

By | proxmox | No Comments

Proxmox is a powerful virtualization solution that can be used to deploy a wide range of applications, including Home Assistant, an open-source home automation platform. In this guide, we’ll show you how to deploy Home Assistant on Proxmox in just a few simple steps.

Step 1: Download the Home Assistant qcow2 file

The first step is to download the Home Assistant qcow2 file from the official Home Assistant website. The qcow2 file is a disk image file that contains the Home Assistant operating system and all of the necessary software packages. You can download the file using the following command:

wget https://download.homeassistant.io/qemuhomeassistant.qcow2

Step 2: Transfer the file to Proxmox

Once you have downloaded the qcow2 file, the next step is to transfer it to your Proxmox server. You can use the Rsync utility to transfer the file over the network. The following command will transfer the file to your Proxmox server:

rsync qemuhomeassistant.qcow2 root@<IP_ADDRESS>:/var/lib/vz/images/

Step 3: Create a new virtual machine

After transferring the qcow2 file to your Proxmox server, the next step is to create a new virtual machine. You can create a new virtual machine using the Proxmox web interface or the Proxmox command line interface. The following command will create a new virtual machine with ID 100 and 2 GB of memory:

qm create 100 --name homeassistant --memory 2048 --net0 virtio,bridge=vmbr0

Step 4: Attach the Home Assistant disk to the virtual machine

The next step is to attach the Home Assistant disk to the virtual machine. You can do this using the following command:

qm importdisk 100 qemuhomeassistant.qcow2 local-lvm
qm set 100 --scsihw virtio-scsi-pci --scsi0 local-lvm:vm-100-disk-0

Step 5: Start the virtual machine

After attaching the Home Assistant disk to the virtual machine, the next step is to start the virtual machine. You can start the virtual machine using the following command:

qm start 100

Step 6: Access Home Assistant

After starting the virtual machine, you can access Home Assistant using your web browser. The URL is http://<IP_ADDRESS>:8123. You can find the IP address of the virtual machine using the following command:

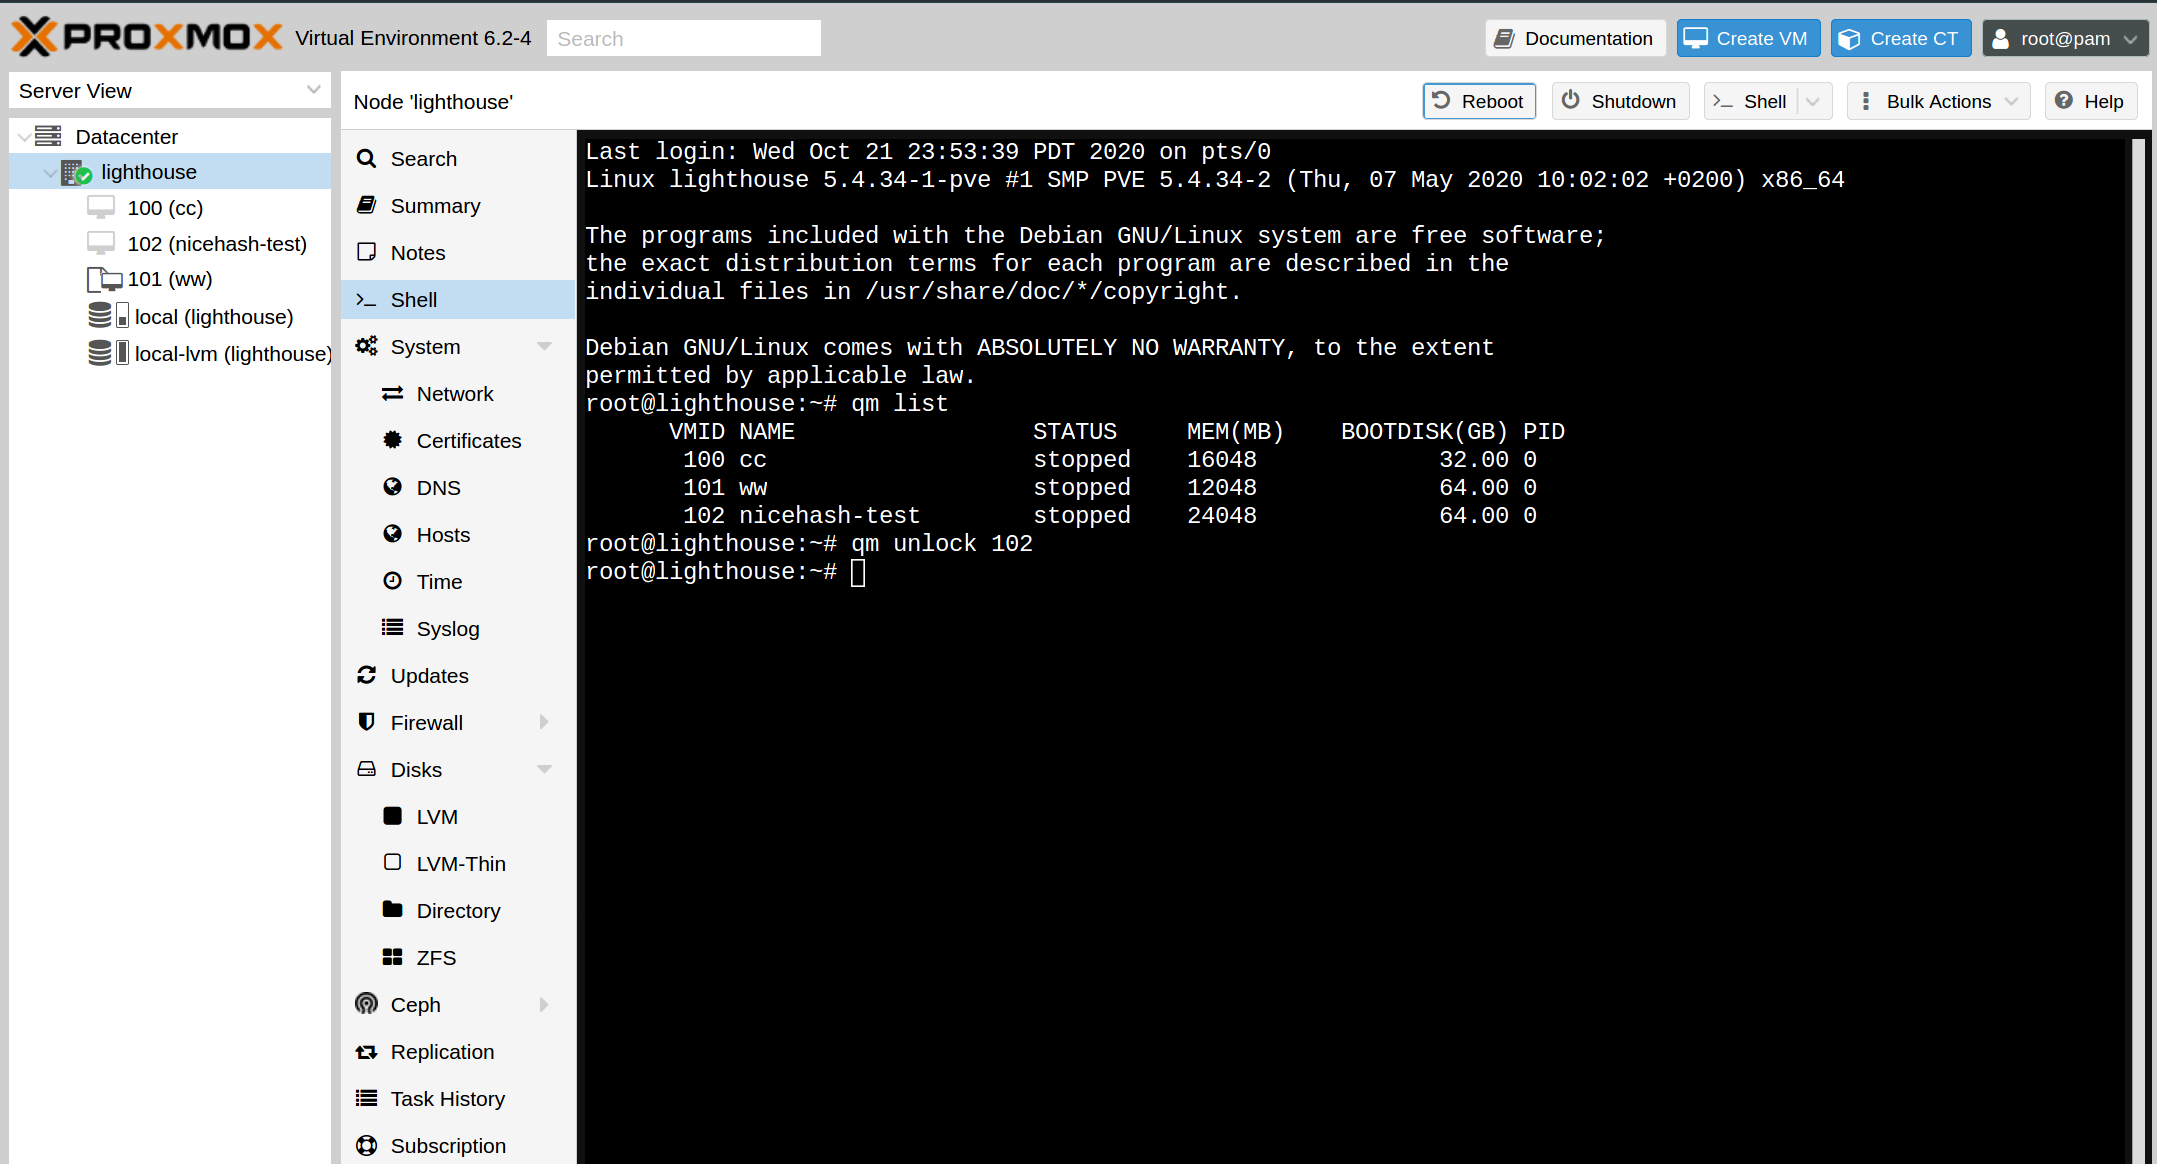
qm list

Conclusion

By following these simple steps, you can quickly deploy Home Assistant on Proxmox and start automating your home. Proxmox provides a powerful and flexible virtualization platform that makes it easy to create and manage virtual machines. Home Assistant, on the other hand, provides a powerful and flexible platform for home automation. Together, they make a great combination for anyone looking to automate their home.

By | proxmox | No Comments

Easily configure the trendnet TEG-10GECTX on Proxmox.

git clone https://github.com/acooks/tn40xx-driver/tree/linux-5.4
cd tn40xx-driver ; git checkout linux-5.4 
make clean ; make ; make install ; update-grub ; modprobe tn40xx

Install nvidia-docker on proxmox

By | Crypto Mining, Linux | No Comments

Install nvidia-docker on proxmox with this easy guide.

Remove the blacklist from /etc/modprobe.d/pve-blacklist.conf by commenting out "nvidiafb"

Add "non-free" to /etc/apt/sources.list
deb http://ftp.us.debian.org/debian buster main contrib non-free

apt-get update
apt-get install nvidia-driver nvidia-smi

Reboot!

apt-get update ; apt-get install docker.io docker-compose
curl -s -L https://nvidia.github.io/nvidia-docker/gpgkey | \
apt-key add -
distribution=$(. /etc/os-release;echo $ID$VERSION_ID)
curl -s -L https://nvidia.github.io/nvidia-docker/$distribution/nvidia-docker.list | \
tee /etc/apt/sources.list.d/nvidia-docker.list
apt-get update ; apt-get install nvidia-docker2

The current guest configuration does not support taking new snapshots

By | proxmox | No Comments

The current guest configuration does not support taking new snapshots is a common problem with Proxmox. Most people don’t know this is easily solved by making sure that the type of storage you use for VM’s is either lvm-thin or ZFS. If you don’t want to take a memory hit, make sure to use lvm-thin. You can also convert existing images to a new disk on the new zfs or lvm-thin storage you setup.

Ryzen 9 3900X on ASRockRack X470D4U2-2T

By | builds | No Comments

Ryzen 9 3900X on ASRockRack X470D4U2-2T running Proxmox with

 docker run -it 88plug/geekbench4

Geekbench 4 Score with stock bios settings is 50889!

https://browser.geekbench.com/v4/cpu/15830970

System Information
  Operating System              Ubuntu 20.04.1 LTS 5.4.34-1-pve x86_64
  Model                         To Be Filled By O.E.M. To Be Filled By O.E.M.
  Motherboard                   ASRockRack X470D4U2-2T
  Memory                        31.4 GB 
  BIOS                          American Megatrends Inc. L3.39A

Processor Information
  Name                          AMD Ryzen 9 3900X
  Topology                      1 Processor, 12 Cores, 24 Threads
  Identifier                    AuthenticAMD Family 23 Model 113 Stepping 0
  Base Frequency                3.80 GHz
  L1 Instruction Cache          32.0 KB x 12
  L1 Data Cache                 32.0 KB x 12
  L2 Cache                      512 KB x 12
  L3 Cache                      16.0 MB x 4

vm is locked proxmox

By | Linux | No Comments

vm is locked is common issue in proxmox that is solved with a simple command to the vm on the command line

qm list
qm unlock $VMID
vm is locked proxmox container

Solves : container is locked proxmox
unlock container proxmox
unlock vm proxmox
vm unlock proxmox

ramdisk

By | Linux | No Comments

The best tool for a ramdisk on linux is simply adding the following line to your /etc/fstab.  Create the new mount directory first of course.

mkdir -p /mnt/ramdisk
sudo echo "tmpfs           /mnt/ramdisk tmpfs      defaults,size=8192M 0 0" >> /etc/fstab
sudo mount -a

How to Migrate Your DigitalOcean Droplet to an Unraid VM

By | Linux | 2 Comments

If you’re tired of paying for a DigitalOcean droplet and want to save money, you can migrate your droplet to an Unraid VM using this simple guide. By running your VPS locally, you could save hundreds or thousands of dollars a year. Here are the steps to follow:

Step 1: Set a Root Password for VNC

Before you start the migration, it’s important to set a root password for VNC. To do this, follow these steps:

  1. Shutdown or restart your DigitalOcean droplet into Recovery Mode in the DO Control Panel.
  2. Take note of the temporary root password shown in the console.

Step 2: Copy the Remote Disk Image of the DigitalOcean Droplet to Your Local Machine

Next, you need to copy the remote disk image of the DigitalOcean droplet to your local machine. You can do this with the following command:

ssh root@43.44.X.X "dd if=/dev/vda" | sudo dd of=88plug.raw bs=64k

This command will create a raw disk image of your DigitalOcean droplet and save it to a file called 88plug.raw on your local machine.

Step 3: Convert the Raw File to a Compatible IMG File for Unraid

After copying the disk image to your local machine, you need to convert it to a compatible img file for Unraid. You can do this with the following command:

qemu-img convert -p -O raw 88plug.raw disk.img

This command will create a disk image file called disk.img that is compatible with Unraid.

Step 4: Sync the Image File to Unraid

Next, you need to synchronize the disk image file to your Unraid server. You can use the following command to do this:

rsync -av --progress -e "ssh -T -c aes128-ctr -o Compression=no -x" disk.img root@tower.local:/mnt/user/domains/88plug/

This command will copy the disk image file to your Unraid server and save it to /mnt/user/domains/88plug/ the directory.

Step 5: Create a New VM with the Same OS as Your DO Droplet

Finally, you need to create a new virtual machine in Unraid with the same operating system as your DigitalOcean droplet. You can do this using the Unraid web interface or command line interface, and you’ll need to import the disk image file you created in Step 3. Here’s an example command to import the disk:

qm importdisk $VMID disk.img local-lvm

And to confirm the VM is created, you can list all available VMs with:

qm list

Bonus round: For other systems use the handy table below

Image formatArgument to qemu-img
QCOW2 (KVM, Xen)qcow2
QED (KVM)qed
rawraw
VDI (VirtualBox)vdi
VHD (Hyper-V)vpc
VMDK (VMware)vmdk

Bonus Round: Convert Raw to QCOW2 for Proxmox

If you’re using Proxmox, you’ll need to convert the raw file to a QCOW2 file format. You can do this with the following command:

qemu-img convert -p -O raw 88plug.raw disk.qcow2

What to do after you install proxmox?

By | Linux | No Comments

So you’ve finally installed ProxMox, now what?!

  1. Install a GUI!
  2. Configure Disks / Raid / Filesystems
  3. Run XShok!
wget https://raw.githubusercontent.com/extremeshok/xshok-proxmox/master/install-post.sh -c -O install-post.sh && bash install-post.sh && rm install-post.sh