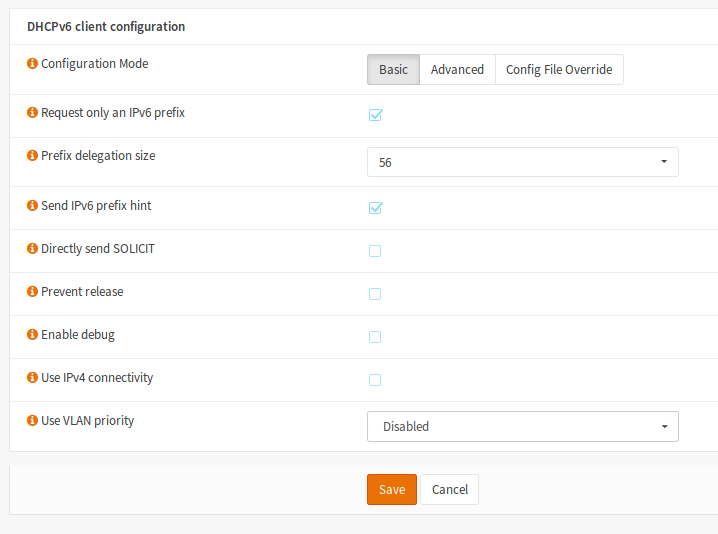
Webpass IPv6 Prefix Delegation must be set to use /56 otherwise the IPv6 address will not be properly assigned to your router.
Here is an example of what this should look like using OpnSENSE
https://192.168.1.1/interfaces.php?if=wan
Webpass IPv6 Prefix Delegation must be set to use /56 otherwise the IPv6 address will not be properly assigned to your router.
Here is an example of what this should look like using OpnSENSE
https://192.168.1.1/interfaces.php?if=wan
How to adblock opnsense is very easy and can be done by running this simple script directly on the machine.
#!/bin/sh

## Clean up any stale tempfile
echo "Removing old files..."
[ -f /tmp/hosts.working ] && rm -f /tmp/hosts.working

## Awk regex to be inverse-matched as whitelist
# - Project Wonderful does unobtrusive ads on a lot of webcomics
# - SolveMedia is needed for captchas on some websites
#whitelist='/(projectwonderful.com|api.solvemedia.com)/'
whitelist='/(api.solvemedia.com)/'

# All Blacklists
blacklist='http://winhelp2002.mvps.org/hosts.txt http://pgl.yoyo.org/as/serverlist.php?hostformat=hosts&showintro=0&mimetype=plaintext https://adaway.org/hosts.txt https://raw.githubusercontent.com/StevenBlack/hosts/master/hosts
https://mirror1.malwaredomains.com/files/justdomains http://sysctl.org/cameleon/hosts https://zeustracker.abuse.ch/blocklist.php?download=domainblocklist https://s3.amazonaws.com/lists.disconnect.me/simple_tracking.txt https://s3.amazonaws.com/lists.disconnect.me/simple_ad.txt
https://hosts-file.net/ad_servers.txt'

## Fetch all Blacklist Files
echo "Fetching Blacklists..."
for url in $blacklist; do
curl --silent $url >> "/tmp/hosts.working"
done

## Process Blacklist, Eliminiating Duplicates, Integrating Whitelist, and Converting to unbound format
echo "Processing Blacklist..."
awk -v whitelist="$whitelist" '$1 ~ /^127\.|^0\./ && $2 !~ whitelist {gsub("\r",""); print tolower($2)}' /tmp/hosts.working | sort | uniq | \
awk '{printf "server:\n", $1; printf "local-data: \"%s A 0.0.0.0\"\n", $1}' > /var/unbound/ad-blacklist.conf

## Original Proccess CMD
#awk -v whitelist="$whitelist" '$1 ~ /^127\.|^0\./ && $2 !~ whitelist {gsub("\r",""); print tolower($2)}' /tmp/hosts.working | sort | uniq | \
#awk '{printf "local-zone: \"%s\" redirect\n", $1; printf "local-data: \"%s. A 0.0.0.0\"\n", $1}' > /etc/unbound/ad-blacklist.conf

# Make unbound reload config to activate the new blacklist
#echo "Restarting unbound..."
#exec /etc/init.d/unbound reload

# Clean up tempfile
echo "Cleaning Up..."
rm -f '/tmp/hosts.working'
echo "Done. Please Restart the DNS Resolver service from the WebUI."
Start by logging into EdgeOS so we can configure your DNS manually.
[raw]
ssh ubnt@192.168.1.1
[/raw]
Turn on configuration mode
[raw]
configure
[/raw]
Disable /etc/resolv.conf from using ISP servers – replace eth1 with your WAN interface
[raw]
set interfaces ethernet eth1 dhcp-options name-server no-update
[/raw]
Replace with your preferred DNS below.
[raw]
edit service dns forwarding
set name-server 208.67.222.222
set name-server 208.67.220.220
top
[/raw]
Finally use DNSMasq, commit and save changes.
[raw]
set system name-server 127.0.0.1
commit
save
exit
[/raw]
To reset the adapter
[raw]
renew dhcp interface eth1
[/raw]

The team at Brave have done an amazing job with the release of their Chrome-based browser, Brave. The browser can be used on all operating systems, and don’t forget to install on your mobile devices – since the bandwidth saving ad-block features really shine on cellular connections.
There’s a new ad game in town. It’s called “Malvertising”. The latest display ad technology can install malware on your laptop without your knowledge. But not with Brave watching your back.
We’ve integrated HTTPS Everywhere into every Brave browser to make sure you are always moving your bits across the safest possible pipe.
Do you ever get that feeling that someone is watching you when you see an ad for something you bought a few days ago? We make sure you aren’t being tracked while you shop online and browse your favorite sites.

https://www.tweaking4all.com/os-tips-and-tricks/macosx-tips-and-tricks/smbup-mac-os-x-smb-fix/
On Mac use SambaUP to use the latest dev build of Samba 3.0
A common error with 10.03-10.05 of FreeNAS Corral is “scanning for existing boot pools” which occurs during installation. The easiest way around this is to use 10.0.2 and then update.

The latest release of FreeNAS Corral is BROKEN and will not install. The error is “scanning for existing boot pools”
The best way around this is to install 10.0.2 and then update! The installers from 10.0.3-10.0.5 are broken at this time.
FreeNAS.org = Download 10.0.2 ISO
This adblock script for the Ubiquiti ERL3 router has been updated to include some of the largest adblock lists around.
I have updated the original file recommended by Ubiquiti to contain more lists. See Pi-Hole.
Login to your ERL3 and edit /config/user-data/update-adblock-dnsmasq.sh
https://gist.github.com/OnlyInAmerica/75e200886e02e7562fa1
If you encounter errors restarting DNSMasq – check [raw]tail -f messages -n1000[/raw]
Receive Side Scaling in UNRAID is currently not possible. This may be a determining factor when considering this for your NAS. Samba 3 supports Multi Channel which allows you to use multiple gigabit Ethernet adapters from mixed manufactures to blast out the stream. You will need RSS support on your adapter to support this, which unfortunately UNRAID does not support, and clearly…should. If you can run RSS between Linux and Windows, then why can’t the Lime guys figure it out too?

Firewall / Router :
1. OpnSense (IPv6 Support – also uses latest Unbound DNS)
2. Untangle (dismal IPv6 support but gets the job done)
3. ClearOS (lacking good IPv6 support)
Access Points:
1. Linkys Velop
2. Orbi – highest throughput
3. Eero
Switches
Cisco SG200-08 8-port Gigabit Smart Switch (SLM2008T-NA) – supports 802.3ad which enables Link Aggregation with LACP (automatically!)
Servers
Plex Media Server – Recommended a specific machine for this transcoder!
PiHole Server – Block Ads and use as DNS Server (override DNS from ISP always with this box)
Backup Server/NAS Solution/Off-Site rsync
Switching from the DNS forwarder to the Unbound resolver has many benefits for your OpnSense system. The main one is that Unbound can also use DNSSEC for validating requests.
To switch, simply follow the steps.
Step 1. Have an OpnSense installation up and running
Step 2. Login to https://192.168.1.1
Step 3. Select Services > DNS Forwarder and disable it
Step 4. Select Services > DNS Resolver > General and enable it, also enable DNSSEC (if your DNS servers support it) and “Enable Forwarding Mode” should be turned on.
Step 5. Save and Reboot for some piece of mind, and enjoy!
Here is what you need to do to configure IPv6 with a fresh OpnSense Installation.
Step 1: Download and Install OpnSense – here are the USB instructions
Step 2: Access your new install at https://192.168.1.1 the default login is root and password is : opnsense
Step 3: Go through default config wizard, selecting DHCP for your WAN connection
Step 4: Select Interfaces > WAN > and set IPv6 Configuration Type to DHCPv6
Step 5: Check that LAN > IPv6 Configuration Type is now automatically set to Track Interface
Step 6: Restart your OpnSense box – you should now see an IPv6 address for both your WAN and LAN interface on the system dashboard.
Gateways should show WAN_DHCP with your IP and WAN_DHCP6 dynamic
These same basic instructions work for pFsense as well although the menu names may be different. My testing showed pFsense detected the IPv6 address automatically and setup everything without intervention on Webpass.